Autotether Wireless Lanyard Standard System Owner's Manual
Browse online or download Owner's Manual for Security access control systems Autotether Wireless Lanyard Standard System. Autotether Wireless Lanyard Standard System Owner`s manual User Manual
- Page / 25
- Table of contents
- TROUBLESHOOTING
- BOOKMARKS
- Autotether 1
- Owner’s Manual 1
- MPORTANT INSTRUCTIONS 3
- Important Instructions 4
- Getting Started 5
- Mounting the Host Unit 6
- Initializing the AUTOTETHER 6
- System 6
- System Test 8
- System Distance Check 9
- Controls & Indicators 9
- FOB Controls and Indicators 10
- FOBs and Settings 11
- O-RING LOCATION 14
- BE SURE O-RING 14
- IS IN PLACE 14
- ACTUATOR TABS 14
- Operation 17
- Operation – Detailed Outline 18
- Alarm System 20
- Troubleshooting 21
- One Year Limited Warranty 22
- 30-Day Money Back Guarantee 23
- AUTOTETHER 25
Summary of Contents
AutotetherTM Owner’s Manual Autotether, Inc. 3 Inspiration Lane, Unit B3 Chester, CT 06412 Phone: (888) 593-4181 Fax: (860) 526-9886 Email: in
9 o If Host is on, press and hold POWER button for less than 2 seconds to start FOB search mode POWER Button Light (Light Emitting Dio
10 If the Host is not found within 3 minutes, the FOB will automatically turn off to conserve battery power The FOB communicates wit
11 WARNING!! Covering a registered FOB with clothing, a flotation device, towel, with your arm or legs, another body of a person, or pet
12 a Passenger type to an Operator type and vice/versa. Contact the factory for instructions on how to do this. . FOB Dipswitch # 4 FOB
13 Using the tip of the Phillips screwdriver, carefully re-position the Dipswitch sliders to set the same new channel in each of the FOBs
14 Clips which are not included: Suzuki, Mercury with side mount or tiller mount or tiller mounted kill switch. These clips are specia
15 3.) Apply pressure to compression tool to push tabs in, at the same time apply pressure to wedge tool. The clip will release. 4.) Remove clip.
16 Operation Once your AUTOTETHERTM system has been installed, turned on and tested, it’s ready for operation. The following scenarios are
17 Operation – Detailed Outline OPERATION – SEARCH When the host is turned on it searches for FOBs. As soon as at least one FOB is registered, t
18 If a missing white (passenger) FOB is registered, the audible alarm and flashing LEDs will be energized upon entering alarm mode. The RESET
1 Table of Contents Important Instructions 3 Getting Started 4 System Test 7 System Distance Check 8 Controls
19 “The Screamer” Autotether Wireless Man Overboard Alarm System Operation All directions outlined above for the Standard Wireless Lanyard S
20 initialize the system and register all of the FOBs. Troubleshooting The AUTOTETHERTM system is designed to be maintained by factory trained rep
21 harmful interference to radio or television reception, which can be determined by turning the equipment off and on, the user is encourage
22 not cover or provide for the reimbursement or payment of incidental or consequential damages. Legal remedies: This warranty gives you specif
23 their purchase excluding shipping and handling costs. The guarantee set forth above is the sole and entire money back guarantee pert
AUTOTETHERTM BOAT SAFER. BOAT SMARTER. Questions? Please contact us using our toll free number or through email. We look forward to hearing fr
2 Thank you for purchasing AUTOTETHERTM – the most advanced user-friendly wireless lanyard safety system on the water. Your AUTOTETHE
3 Important Instructions Prior to setting up the system and starting your engine(s) make certain the area around the propeller(s) is clear; A
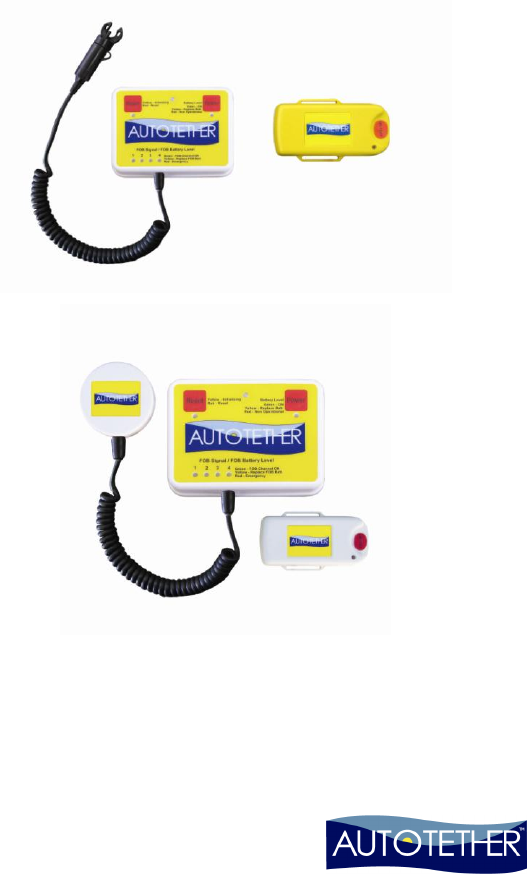
4 Getting Started Basic Operation. The AUTOTETHERTM wireless lanyard system comes with a transmitter (Host) that is attached to your
5 Install six new (6) AAA batteries in the Host unit. Make certain to install the batteries according to the “+” and “-“ mark
6 CAUTION DO NOT discard your Original Equipment clip! Store it near the engine start switch; it serves as a back-up to the AUTOTETHERTM
7 System Test A complete system test should be performed before initially getting underway. This check is performed dockside with the vesse
8 System Distance Check A system distance check should be performed before initially getting underway. This procedure verifies system
© 2020, manymanuals.com. All rights reserved. | 1.472 s |
 Manymanuals.com
 Manymanuals.de
 Manymanuals.fr
 Manymanuals.it
 Manymanuals.pl
 Manymanuals.cz
 Manymanuals.es
 Manymanuals-pt.com
Comments to this Manuals